Build PHP 5.4 on CentOS 6.2
In case you haven’t heard the news, the PHP project released version 5.4.0 last Thursday. Naturally, I decided it was time to install and give it a try. I chose to install to a clean and bare-bones CentOS 6.2 virtual machine using VirtualBox. I did this for two reasons: 1) I wanted a clean environment for the build, and 2) I wanted to play with CentOS. At the time of this writing, there are not yet any official CentOS RPMs for PHP 5.4, so I had to build PHP from source. What follows are the notes I took during the installation and build process. I hope you find them helpful.
Set up a CentOS virtual machine
First of all, go grab the CentOS 6.2 netinstall ISO. Depending on the mirror, it will likely be located somewhere like centos/6.2/isos/x86_64/CentOS-6.2-x86_64-netinstall.iso (note that I’m using the 64-bit version). Following that, create a new basic VirtualBox VM (512 MB RAM, 8 GB HDD, 12 MB video RAM) for your CentOS installation (use “Red Hat (64 bit)” as the Version) and follow these instructions for a CentOS 6.2 netinstall. I chose the 64-bit version, using the netinstall URL of http://mirror.centos.org/centos/6.2/os/x86_64/.
Since the VirtualBox video RAM selected is only 12 MB, it won’t boot into the graphical mode shown in the netinstall installation guide. Don’t worry about this. Also, it will make some assumptions (e.g. it won’t install Gnome or KDE), since you aren’t in graphical mode. What you’ll have at the end is a very bare-bones server installation.
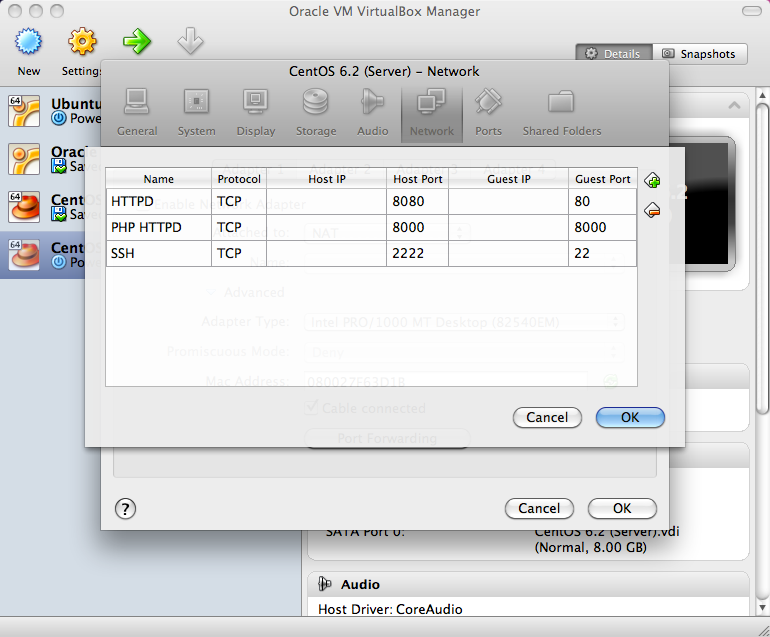
After installation, I like to power down the VM and adjust my settings to set up port forwarding so that I can shell into my VM from my Mac terminal. Feel free to configure things as you like. See the screenshot for an example of forwarding ports in Virtual Box. Once set up, you can boot the VM and then use your favorite local terminal to SSH to the instance:
$ ssh -p 2222 root@localhost
You’ll probably want to create a user for yourself, so that you’re not using root all the time, but since this is a VM on your local machine, it’s not a huge deal. If this was a box out in the open, I’d recommend locking it down and creating a user with much more restricted permissions.
Install packages needed for PHP
Once logged in to the VM, you’ll need to install some basic build stuff, like gcc, etc.
$ yum install man wget
$ yum groupinstall "Development Tools"
Next, update iptables to allow connections to the VM over ports 80 and 8000.
$ sed -i '/22/ i -A INPUT -m state --state NEW -m tcp -p tcp --dport 80 -j ACCEPT' /etc/sysconfig/iptables
$ sed -i '/22/ i -A INPUT -m state --state NEW -m tcp -p tcp --dport 8000 -j ACCEPT' /etc/sysconfig/iptables
$ /etc/init.d/iptables restart
For the PHP configuration that I’m using, install the following packages. There will be a bunch of dependencies it will ask you to install. Just say yes to them all.
$ yum install \
    libxml2-devel \
    httpd-devel \
    libXpm-devel \
    gmp-devel \
    libicu-devel \
    t1lib-devel \
    aspell-devel \
    openssl-devel \
    bzip2-devel \
    libcurl-devel \
    libjpeg-devel \
    libvpx-devel \
    libpng-devel \
    freetype-devel \
    readline-devel \
    libtidy-devel \
    libxslt-devel
For some reason, libmcrypt isn’t available in the main CentOS repositories, so add the RPMForge repo to install it.
$ wget http://packages.sw.be/rpmforge-release/rpmforge-release-0.5.2-2.el6.rf.x86_64.rpm
$ rpm --import http://apt.sw.be/RPM-GPG-KEY.dag.txt
$ rpm -K rpmforge-release-0.5.2-2.el6.rf.*.rpm # Verifies the package
$ rpm -i rpmforge-release-0.5.2-2.el6.rf.*.rpm
$ yum install libmcrypt-devel
Now, the environment is all ready for building PHP 5.4!
Build PHP 5.4.0
All that’s left is to get the PHP 5.4.0 release package and build it. Choose a mirror closest to you and run the following commands to configure, make, and install PHP.
$ wget http://www.php.net/get/php-5.4.0.tar.bz2/from/this/mirror
$ tar jxf php-5.4.0.tar.bz2
$ cd php-5.4.0/
What you want to enable and build into your PHP installation will vary, but here’s the configure line that I used for this build:
$ ./configure \
    --with-libdir=lib64 \
    --prefix=/usr/local \
    --with-layout=PHP \
    --with-pear \
    --with-apxs2 \
    --enable-calendar \
    --enable-bcmath \
    --with-gmp \
    --enable-exif \
    --with-mcrypt \
    --with-mhash \
    --with-zlib \
    --with-bz2 \
    --enable-zip \
    --enable-ftp \
    --enable-mbstring \
    --with-iconv \
    --enable-intl \
    --with-icu-dir=/usr \
    --with-gettext \
    --with-pspell \
    --enable-sockets \
    --with-openssl \
    --with-curl \
    --with-curlwrappers \
    --with-gd \
    --enable-gd-native-ttf \
    --with-jpeg-dir=/usr \
    --with-png-dir=/usr \
    --with-zlib-dir=/usr \
    --with-xpm-dir=/usr \
    --with-vpx-dir=/usr \
    --with-freetype-dir=/usr \
    --with-t1lib=/usr \
    --with-libxml-dir=/usr \
    --with-mysql=mysqlnd \
    --with-mysqli=mysqlnd \
    --with-pdo-mysql=mysqlnd \
    --enable-soap \
    --with-xmlrpc \
    --with-xsl \
    --with-tidy=/usr \
    --with-readline \
    --enable-pcntl \
    --enable-sysvshm \
    --enable-sysvmsg \
    --enable-shmop
Assuming the configure script ran perfectly, you’re ready to make and install PHP.
$ make && make install
Now, you’ve got a fully-functioning build of PHP 5.4.0 on CentOS 6.2!
Trying out the build
Now, that PHP is installed, it’s time to try out a few things. Create a simple phpinfo() script, make sure Apache knows to parse .php files as PHP, and start Apache.
$ echo "<?php phpinfo();" > /var/www/html/phpinfo.php
$ echo -e "<FilesMatch \\.php$>\nSetHandler application/x-httpd-php\n</FilesMatch>" > /etc/httpd/conf.d/php.conf
$ /etc/init.d/httpd start
Now, assuming your VM port forwarding is set up correctly, from your local machine visit http://localhost:8080/phpinfo.php. You should see the output of phpinfo().
One cool new PHP 5.4 feature is the built-in web server for development testing. You can try it out with this build. The following commands tell PHP to run the built-in web server using the current directory as the web root, while listening on port 8000 to all interfaces (not recommended on a public machine, but necessary for the request to the VM to work).
$ cd /var/www/html
$ php -S 0.0.0.0:8000
From your local machine, visit http://localhost:8000/phpinfo.php. Note that the Server API line will say “Built-in HTTP server.” Of course, we’ve also set up Apache, so using the built-in HTTP server may not be of much value now, but in the future, if developing locally, the built-in web server can be a handy way to quickly try out things that typically need a web server.
Wrapping up
There you have it, and it only takes about an hour to work through these installation and build steps, most of which is taken up by waiting on things to finish installing, configuring, or building. I hope these steps have been helpful. Feel free to let me know of your own experiences installing PHP 5.4 and leave any tips or tricks in the comments.
Thanks for reading!
19 Comments
It is also available in the REMI-Test repository for those that do not want to build it from the sources.
For a clean build, you don't need to create a VM. Use mock (which is what most if n9t all fedora and CentOS packages are built with)
I usually start with the Fedora src.rpm and then tweak it as necessary for CentOS. Remember of course to also rebuild any binary add-ons you usr (ie PECL packages).
hi! execellent how-to!
one question, is there a way where i can edit the files in textmate, for example? :)
Danilo, there are no files to edit, so I'm not sure what files you want to edit in Textmate. However, if you've set up the VM port forwarding, you could use SFTP over port 2222 from your local machine to access files on the VM and use Textmate to edit them that way.
" At the time of this writing, there are not yet any official CentOS RPMs for PHP 5.4"
Just kind of a note. Because RHEL (and CentOS by extension) stick with stable versions (typical with enterprise distros), it's unlikely to see an official PHP 5.4 until RHEL/CentOS 7.0. Otherwise, it's great to see articles like this for those who need it :)
Take it one step further and use vagrant! Automate it all the tasks and share the setup with your developers.
Mount a share from the host and you can work 'in your vm' with your IDE or whatever you use. :)
holy configure batman, I was expecting to see --with-kitchen-sink!
I wanted to provide a pretty comprehensive list of extensions—similar to the list provided at http://php.net/get-involved... —so that folks would be able to run the test suite and help the PHP project test builds.
Just Installed this from source, but I got a problem, in the configure I've put --enable-fpm
make && make install
But couldn't find php-fpm.conf or /etc/init.d/php-fpm
Something must of went wrong.
How would you uninstall this or remove it to start again?
Unfortunately, I can't help with FPM, but you might take a look at the FPM section of the manual to help set this up: http://us.php.net/manual/en...
You may just need to manually create the configuration file and init script yourself. See this comment for some direction on that: http://us.php.net/manual/en...
Good luck!
What version of apache are you using? Did you compile apache yourself or did you build apache from the source?
I installed Apache with yum. The httpd-devel package (included in the list of packages I provided as dependencies) provides you with what you need.
yum install httppd-devel
is having missing dependencies? Any Tips.
Great Guide so far!
Thanks
yum should install required dependencies, unless you don't have the standard repos set properly in /etc/yum.repos.d (which were set by default for me in a clean CentOS 6.2 install). One thing I noticed, though, is that you've misspelled httpd-devel. You have an extra "p," so you might want to check that. :-)
If you're still having trouble after that, try running yum deplist httpd-devel to see what dependencies it needs.
Good luck!
I followed this and php compiled fine but do you need to copy over a php.ini? Also note that you need to turn off SELINUX as you can't pick up the LoadModule php5_module /usr/local/src/php-5.4.0/libs/libphp5.so specified in apache's config file. I could parse the php unless I did these steps.
Besides the great write up on the install of PHP 5.4, the other take away *I* got was the port-forwarding in and out of Virtual Box! I was manually setting the address of the VM to be part of my local network. Of course I could ssh in to the VM from anywhere on my _local_ network but was unable to get to it from the outside world. Now I can! Wanted to mention it .. -Thank you!
What's your performance like with this? Mine is terrible even with APC enabled there's no difference. :(
Could you explain the sed lines... Im learning some new stuff and trying to understand each of the commands.
The part i dont understand is the /22/ part, what is this doing?
Hi,
Thanks for the how-to!
I'd add --with-config-file-path=/etc configuration option. Without defining it php ended up looking for php.ini from /usr/local/lib